Introduction
Capturing a meteor on film requires great patience. One estimate says that you may need to accumulate 100 hours of exposure time with a standard 50mm lens on an average 35mm camera to capture one meteor. Of course, this cannot be done on a single frame, and usually implies a dedicated effort with many rolls of film over many nights. However, a meteor trail across a background of stars can make one of the most interesting astronomical photos that you can achieve with simple equipment. Attention to a few simple details can also substantially increase your meteor capture rate.
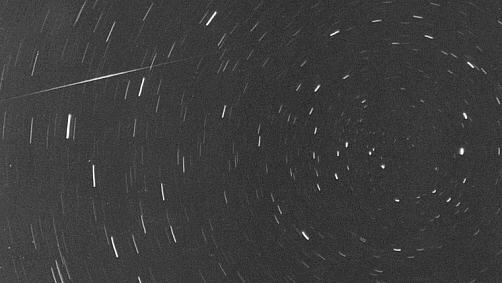
Photo by Dan Lewis. 15 minute exposure on Tri-X. Meteor passes near south celestial pole.
Choosing the Equipment
Many cameras are suitable for meteor photography, although some are much better than others. The most important requirement is that the camera permits long time exposures. This in general will require a camera which allows a large degree of manual control or selection of shutter speeds and aperture settings. Older 35mm format cameras are excellent in this respect. The camera must have a B(for flashBulb) or a T(Time) setting on the shutter speed selection control.
You will need a sturdy tripod or some other form of solid mounting to which the camera can be rigidly fixed, and which does not move or vibrate with the wind. It also helps, but is not absolutely necessary, to have a shutter cable release that can be screwed into the shutter release button on the camera. These can be purchased for around $20 from many photographic or camera stores. This device helps minimise vibrations of the camera during the period when the shutter is opened and then closed at the end of the exposure.
The lens you use with the camera has the greatest bearing on how long you will have to wait to capture a meteor trail. The standard lens on most 35mm cameras will have a focal length of either 50 or 55mm. This should be regarded as the longest focal length useable. Better would be a wide-angle 35mm or 28mm lens. There is however, a trade-off with regard to the aperture of the lens. The aperture is normally expressed as a focal ratio or f stop. An average lens may have a minimum f stop of 2.8. This is when the iris in the lens has been fully opened, and the lens is thus referred to as f/2.8 lens (with focal length of 50mm). A really good standard lens (for 35mm format cameras) will have a focal ratio of f/1.4. Such a lens will focus more light onto the film in the camera. Thus the lower the focal ratio, the better the lens. Wide angle lenses, although they cover more sky (and thus have a greater probability of meteor capture), normally do not have as good a focal ratio as do standard lenses. Telephoto lenses cover such a narrow field of view that they are usually unsuitable.
In summary, a good lens will cover as wide a field of view as possible (this means it will have a small focal length), and as small a focal ratio as possible. The tradeoff between focal length and focal ratio is discussed more fully at the end of this page.
Film for the camera may be colour or black and white but should have a ISO/ASA speed rating of 1000 or greater. Lower speed film may be employed but the waiting time to capture your first meteor trail will be longer. Film with a high reciprocity failure is also very suitable for meteor photography. A film with no reciprocity failure is one whereby a long time exposure with a very small aperture will produce an identical result to a short exposure with a large aperture. Not many films are perfect in this respect, as their sensitivity tends to decrease once exposures exceed a few seconds. Although this is undesirable for normal astronomical photography, it is ideal for meteor photography, as it prevents excessive background fogging while having little effect on the short duration burst of light from the meteor. Some very high speed black and white films tend to have a large reciprocity failure. Colour film gives a more visually pleasing effect than black and white, and costs associated with colour film (both acquisition and commercial processing) are now identical for the two. However, if you wish to do your own developing and printing, black and white film is certainly easier and less expensive.
The meteor trail shown above was taken using Kodak Tri-X (black and white) film.
Setting Up
The important points in setting up your equipment to photograph meteor trails include place and time: where to point the camera, what dates and times to take photographs, and how long to expose each frame.
Meteors are visible on all nights of the year, but their number can increase substantially on certain dates. Around these dates shower meteors may be seen in greater numbers than the ever present sporadic meteors. Well known meteor showers are the Perseids, the Orionids and the Leonids (note: the Perseids are not visible from the southern hemisphere). There are also many other showers. A table of meteor showers should be consulted before any meteor photography is attempted, as exposures taken during these times have a greatly increased chance of capturing a meteor trail. Shower and sporadic meteors also have different characteristics which effect your setting up.
Sporadic meteors may appear at any time anywhere on the sky. For these, it is best to point your camera directly overhead, at the zenith. This is because overhead meteors will be closer to the camera, and their light will have to travel through less atmosphere. Both of these factors will produce a brighter trail with a consequently greater chance of capture on your film. Note that with a fixed camera, stars will appear as trails in the background. If you know the direction in which the camera is pointing, you can determine the elevation and azimuth of the start and end points of any meteor trail. Some people who have a telescope with a sidereal tracking drive prefer to mount their camera on the telescope. In this case, the stars will appear as points. Right ascension and declination of the trail may then be determined. If the time of the meteor is known from visual observations, then the elevation and azimuth may still be calculated.
Note that photographic film will only record the brighter meteors. Many a person involved in meteor photography has visually observed a meteor that "was certainly in the camera's field of view" only to be disappointed upon film processing because the meteor brightness was inadequate.
The lens aperture should be opened right up (the f/stop as small as possible) and the focus set to infinity, prior to opening the shutter. Typical exposure lengths normally range from 5 minutes to one hour. There are two opposing forces at work here. You require maximum exposure time to maximise the probability of meteor capture. However, too long an exposure can cause background fogging of the film due to both natural and artificial light sources. Obviously it is best to choose the darkest possible location you can away from a major city, and at times of no moon. However, not everyone can do this. And even in a dark location, natural sources of light arise from skyglow, interplanetary dust and integrated starlight. When you first start in meteor photography it will be necessary for you to try a range of exposures. If you have a good dark location you might try 5, 10, 15, 20, 30, 45 and 60 minute exposures. If you live in a large city your exposures should probably be limited to 5, 10 and 15 minutes. After you have had your first film processed, you can then decide what is the longest exposure time suitable for your conditions.
Remember, what is important in meteor capture is the total exposure time. Ten hours total exposure may be achieved by ten single exposures of one hour duration each or forty exposures of 15 minutes duration. The latter, of course, uses four times as much film.
In the case of sporadic meteors, the greatest apparent meteor rate occurs in the morning hours as opposed to the evening hours. This is because in the morning, the Earth is running into the meteoroids, whereas in the evenings it is moving away from them. The effect is the same as a car moving through rain. More raindrops fall on the front windscreen/windshield than they do on the rear window. The most profitable hours for sporadic meteor photography are the three hours before morning twilight (dawn).
For shower meteors, slightly different conditions apply. The best time to observe the largest numbers of meteors is at the time of peak shower activity. Some showers have very broad peaks whereas others may peak and die off in a few hours (and in the case of meteor storms, where visual rates exceed 1000 meteors/hour, the peak may be only a few tens of minutes in duration). It is then obvious that for narrow peak showers, you need to search for the time of peak activity. This information may be found on several web sites (eg the International Meteor Organisation).
Meteors all belonging to the one shower appear to diverge from a single point (or at least a very small area) in the sky. This point is termed the shower radiant (the meteors radiate from the radiant). The greatest probability of meteor capture is obtained by pointing your camera at a point about 45 degrees away from the radiant. Consistent with this direction, you should also aim the camera as close to the zenith as possible (for the previously mentioned reasons).
All that then remains is to open the shutter. Use a watch or other portable timepiece to time your exposure. Radio Shack and others sell a countdown chronometer which signals the end of the preset time with an alarm. This saves the necessity of having to continually look at your watch (using a subdued red flashlight). Close the shutter as soon as possible at the end of the exposure time. Also be sure to make written records of the date, start time and duration of all exposures. Include a film number for later reference, and you may care to annotate the exposures in which you are sure that a bright meteor passed in front of the camera.
In the hour or so before dawn (or after dusk), you are very likely to capture trails of satellites as they move across the sky. Because they move much more slowly than meteors, the brightness threshold for satellite capture is considerably lower than it is for meteor capture. You should have no trouble when looking at your final prints in determining which trail is a satellite and which a meteor, but I will leave you to think about the differences you might expect.
Technical Information
A famous Canadian meteor physicist published what is still probably the best book of meteor science in which he states a formula that can be used to compute the relative efficiencies of various lenses for meteor photography. I have used this formula to produce the graph below.
This graph only applies to 35mm format cameras. It is standardised on an average total exposure time of 10 hours to capture a meteor trail with a standard 50mm focal length lens with a focal ratio of f/1.4, using 1000 ISO film, and making exposures of sporadic meteors in the morning hours. This is a very approximate value that will change with many conditions. However, it does allow a comparison as to which lens you should use if you happen to have a choice. Note that a 50mm f/1.4 lens is much more efficient than a wide-angle 24mm f/2.8 lens.
If you are interested in following the technicalities of this further, you might like to read the article by Roger W Sinnott in Sky and Telescope, page 85, February 1994. This includes a computer program in the BASIC language that will allow you to evaluate the relative efficiency of a much wider range of cameras.
Beyond simple photography of meteor trails lies the possibility of orbit determination. This requires two cameras located some distance apart but which cover the same portion of the sky (at least at meteor altitudes - around 100km). Another variant is to add a rotating shutter in front of a camera to enable velocity determination of the meteor. Some people have even tried a piece of diffraction grating (replica gratings on plastic film may be purchased cheaply from Edmund Scientific) in front of the camera to record meteor spectra. This requires immense patience, for it only works for very bright meteors, but it has the possibility of detemining the elements involved in the meteor ablation process.
Reading
DWR McKinley, Meteor Science and Engineering, McGraw-Hill (Toronto, 1961)